 |
||
|
|
||
|
|
||
|
|
||
|
|
||
|
|
||
|
|
||
|
|
||
|
|
||
|
|
||
|
|
||
|
|
||
|
|
||
|
|
||
|
|
||
|
|
||
|
|
||
|
|
||
|
|
||
|
|
||
|
|
||
|
|
||
 |
|
||||||||||||||||
|
|
|
|
|||||||||||||||
|
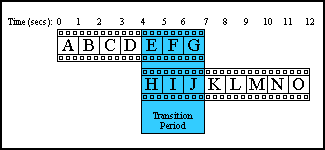
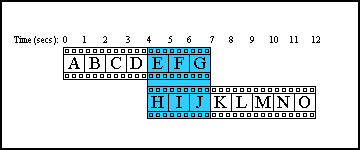
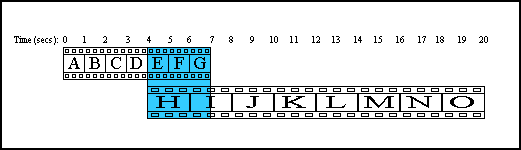
Overview In this overview, we cover some of the fundamental concepts of video editing. If you don't have much experience with video editing, the process can seem complex at first. However, the process will quickly begin to make sense as soon as you start working with actual media. personalStudio projects are assembled by placing media clips sequentially on the "storyboard," which is where you control the basic order of media. Each clip is blended into the next clip by a "transition." You can adjust the length and type of the transition to customize its appearance. How transitions work The purpose of a transition is to blend two separate media files together, providing a sense of flow between the two. Whenever you add another media element to a presentation, personalStudio automatically puts a transition between it and the previous one. The default transition is "Dissolve" with a duration of two seconds. To create a straight cut ("jump cut"), simply create a transition with a length of zero seconds. As an example, let's consider a presentation that contains two clips. For simplicity, let's say they have a frame rate of one frame per second, and each frame contains a different letter of the alphabet. Let's also say that our transition lasts three seconds rather than the default two seconds. The picture below shows the transition period in blue. Our seven second clip and eight second clip overlap by three seconds (our transition duration). This produces a twelve second presentation.
Editing Clips In standard video editing parlance, altering the duration and start and stop points of video clips is called "clip editing." In personalStudio, there are several ways to edit clips. The primary interface for clip editing is the Clip Edit panel, which lets you shift a clip in time, stretch a clip, or trim frames from the start or the end of a clip. When you Shift a Clip When you shift a clip in time, you don't change its duration or frame rate. Rather, you move its starting and ending position within the presentation. This may or may not change the overall length of the presentation, depending on where the clip is situated. In the example below, we'll begin with our two clips of seven and eight seconds, with a three second transition.
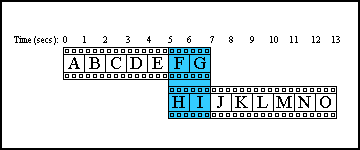
When we shift the second of our two clips to the right by one second, we extend the length of the overall presentation by one second, from 12 to 13 seconds.
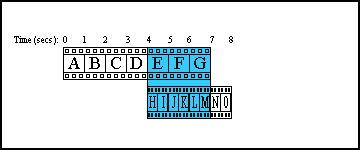
A Word About Framerates and Duration One movie clip can vary from another in many different ways. For example, clips can vary in duration, framerate, resolution, size, and format. The concepts of duration and framerate are particularly important, however, because framerate and duration affect each other. Framerate is the number of frames-per-second a movie will display, while duration refers to the length of the movie. Multiplying the two will give you the total number of frames within the movie. If you increase the duration of a clip you will decrease its framerate, because you are displaying the same number of frames in a longer period of time. Likewise, if you decrease a movie clip's duration, you will increase its framerate, because you are displaying the same number of frames in a shorter period of time. When You Stretch a Clip When you stretch a clip, you lengthen its duration, and this decreases its framerate. For example, in the following illustration we'll take our two movie clips and stretch the duration of the second.
Here, we've changed the duration of the second clip from eight seconds to 16 seconds, and therefore decreased our framerate from one frame-per-second to one-half frame-per-second.
When you Shorten a Clip When you shorten a clip, you decrease its duration, and this increases its framerate. For example, in the following illustration we'll take our two movie clips and shorten the duration of the second.
Here, we've changed the duration of the second clip from eight seconds to four seconds, and therefore increased our framerate from one frame-per-second to two frames-per-second.
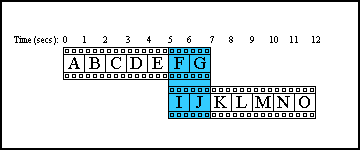
When you trim the front of a clip When you trim the front of a clip, personalStudio removes frames from its "head." Let's look again at our original pair of clips.
If we trim one second from the front of the second movie, we eliminate its first frame. Note that we have not changed the duration of the entire presentation, because our change affected only the transition area, not the overall movie.
When you trim the back of a clip When you trim the back of a clip, personalStudio removes some frames from the back of the movie. Again, using our original pair of clips:
If we trim one second from the back of the second movie, we eliminate its last frame.
Although there is more to the process, these cover the basic principles of clip editing. You'll learn more as you work with your clips and experiment with personalStudio's clip editing options. For more information on clip editing in personalStudio, see the Clip Edit section.
|
|||||||||||||||||
|
|
|||||||||||||||||